THE GRUB REPORT: Ingredient of the week: Lemongrass
I admit it. We're in a rut.
Despite our best intentions, we eat out way too often.
When you're crunched for time on a lunch or dinner break, it's tough to find the oomph it takes to make a meal at home.
Not to mention that our oven/microwave combo has been out of commission for weeks. (Between ordering parts and scheduling appointments, the repair process has taken way too long. But we're hoping to be back in the baking business next week.)
Even without an oven, though, there's one particular category of food that is usually fairly simple to make on a weekend, with enough leftovers to last a few hectic weekdays: soup.
I love soup. I crave soup. And it's just not the type of thing that most restaurants do well. So a couple weeks ago, a trip to a supermarket in a neighboring county inspired us to cook up our own take on a Thai classic, Tom Ka Gai.
There were plenty of exciting things in the produce section that day. Parsley root. (What would that add to a braise or stew?) Purple carrots. (So familiar, yet so strange. Do they taste different than the orange ones?) Green and orange and purple cauliflower. (Roasted? Pureed? Curried, even?) But it was the lemongrass that we decided to bring home that day.
I've had Tom Ka Gai in a few different Thai restaurants, and I have to admit that they've been a little too heavy on the lemongrass for my taste. The woody stalk's distinctive tang quite easily crosses the line into overpowering. So we weren't exactly going for authentic. We focused on the main flavors -- coconut and lemongrass -- and built from there.
You might find recipes for this type of soup that call for plenty of exotic ingredients. Kaffir lime leaves. Special chilies or chili paste. Galangal. If you're going for authentic, there are Asian markets in bigger cities where you could probably track down such things, not to mention online shops.
But we were going for Thai-inspired flavor in a simple weekend soup. So besides the lemongrass, and the few drops of fish sauce we added (which you could get by without), everything in this recipe is quite easily obtainable here at our local groceries. We decided to add wonderful, meaty shitake mushrooms for a little more substance (which, I learned from online research, is similar to a common Thai variation, Tom Ka Het).
And the result was delicious. It balanced just between light and heavy, refreshing and creamy, bracing and comforting. The lemongrass flavor was there, but not overpowering.
So the next time you see lemongrass -- and who knows, it might be sooner than you think, with a new grocery opening here in our city this spring -- consider trying your hand at this Thai-inspired dish. We steamed up some basmati rice to pair with it, and I loved the two combined into one bowl, too.
Coconut, Lemongrass and Shitake Soup
Ingredients
2 cups canned low-salt chicken broth
1 14-ounce can unsweetened coconut milk
1/2 cup 1/4-inch-thick slices fresh lemongrass (at least two stalks)
Several chicken tenders, pounded thinner with a mallet and cut into pieces
1 tablespoon lime juice or more to taste
Soy sauce and fish sauce to taste (or, alternately, salt to taste)
Half a jalapeno chili (or whole one, if you like), chopped
1 package shitake mushrooms, sliced
Finely chopped fresh cilantro
Directions
Bring first 3 ingredients to boil in heavy medium saucepan. (If desired, you can place the lemongrass slices into a tea ball or tie it in cheesecloth before adding it to the liquid. It's simply used to flavor the soup; you don’t want to eat it, and putting it in some sort of straining device like the options mentioned above makes it far more simple to fish it out of the liquid.)
Reduce heat, add chicken and simmer until cooked through.
Remove the chicken to a plate. (You can add it back in later or save it for a different dish, like we did.) You can also remove the lemongrass at this point, or you can leave it in a little longer to impart a more of its flavor to the soup. (Even if you leave it in longer, the flavor's pretty mild. The amount used in this recipe is less than is used in a more authentic preparation, I suspect.)
In a small bowl, mix together lime juice and soy sauce and fish sauce, if using. (If you don’t use either of these sauces, you'll need to add salt to taste.)
Add juice and sauces, along with jalapeno and shitakes to soup, and simmer until reduced, about 20 minutes.
Remove lemongrass, if you haven't already done so.
If desired, add chicken back to liquid to reheat.
Adjust seasoning, adding more salt or soy/fish sauce or more lime juice, if desired.
Ladle soup into bowls, and sprinkle each serving with fresh cilantro (or stir the cilantro into the pot just before serving.)
Serve with rice as a side, or ladle soup over it. Another good garnish is Sriracha chili sauce, if you want to kick up the heat. (Just don't forget, a little goes a long way!)
Originally posted to The Grub Report by By Patricia Gibson on Monday, March 30, 2009 11:06 PM EDT
About a month ago, at the June First Friday festival in downtown Marion, a spring specialty caught my eye at the produce stand. I couldn't pass up the chance to take some of the big, bright red stalks home with me. As I walked back to the office, more than one person among the crowds took notice. As I passed, I heard one or two say, "Oooh, rhubarb!"
Once I got back to work, though, the response wasn’t quite the same. "What," a coworker asked curiously, "is that?!?" She'd never heard of rhubarb. "Preposterous!" I thought. Surely rhubarb, the stuff we found growing in the backyard when my family moved to Yorktown when I was young, wasn't that unpopular. But once challenged to explain what, exactly, it is, I realized that there's nothing quite like it, nothing I could compare it to.
It looks like giant Swiss chard, with texture a little like celery and a taste like, well, like … Like nothing else! The astringent tang. The faintly fruity flavor (even though it is, technically, a vegetable). And the leaves are poisonous, by the way! But this description just doesn't do this wonderfully strange plant justice.
So I did a little poking around online to find out more about it. (I even found a rhubarb festival in a town that calls itself the rhubarb capital of Minnesota!) Turns out this vegetable grows from spring to fall in cooler climates. But it doesn't grow well once temperatures reach 90 degrees, so around here it's pretty much a spring and early summer crop. But it does require cold temperatures to spur it into sprouting, so it doesn't grow well in the South, either.
And, according to http://www.rhubarbinfo.com/, a plant will only grow for so many years before it just dies out. That's what happened to that old plant in my parents' backyard.
All these quirks together have given it the reputation now of being somewhat an old-fashioned exotic, I think.
Well, I say that's a shame. I'm going to lead the charge. I'm going to try my hand at growing rhubarb, and I urge you to too. According to what I found on the Internet, it's a fairly tough plant that can survive neglect. (Something those plants in my parents' backyard, the only plants still there when we moved in, were proof of.) So let's bring back into our regular rotation of treats.
Here's a recipe to help you do that. It features the classic combination of strawberry and rhubarb.
Strawberry Rhubarb Pie Crust (for one 2-crust pie)
2 2/3 cups all purpose flour
2 tablespoons sugar
1 teaspoon salt
12 tablespoons (1 1/2 sticks) chilled unsalted butter, cut into 1/2-inch pieces
4 tablespoons chilled solid vegetable shortening, cut into ½-inch pieces
6 tablespoons (or more) ice water
Filling
1/2 cup sugar
1/2 cup golden brown sugar
1/4 cup cornstarch
1 teaspoon grated lemon rind
1/8 teaspoon ground nutmeg
Pinch of salt
2 1/2 to 3 1/2 cups sliced fresh strawberries (about 16 oz.)
2 1/2 to 3 1/2 cups fresh (1/4-inch-thick) rhubarb slices (1 1/2 pounds or more)
2 tablespoons fresh lemon juice (or less if you want your pie on the sweet end of the sweet-tart flavor combo)
1-2 tablespoons butter or margarine, cut into pieces
Make crust:
Mix flour, sugar and salt for crust in food processor or stir well.
Add butter and shortening. Using on/off turns with processor, or by hand with pastry blender, mix until mixture resembles coarse meal.
Drizzle 6 tablespoons ice water over mixture. Process or mix just until moist clumps form, adding more ice water by teaspoonfuls if dough is dry.
Gather dough into ball; divide and flatten each half into a disk. Wrap in plastic; chill until dough is firm enough to roll out, about 30 minutes.
Roll out half of dough on lightly floured work surface to 12-inch round (about 1/8 inch thick).
Transfer dough to 9-inch-diameter pie dish. Trim excess dough, leaving ¾-inch overhang. Chill, covered, until ready to use, up to 2 days.
Prepare filling:
Preheat oven to 400 degrees.
Combine first 5 ingredients; stir in strawberries, rhubarb, lemon juice and pinch of salt. Let stand 20 minutes.
Compose pie:
Meanwhile, roll out second half of dough to about a 13-inch round, about 1/8-inch thickness, and cut into 1/2-inch strips for lattice top.
Spoon mixture into crust and dot with 1 to 2 tablespoons of butter.
Arrange strips in lattice pattern on top of pie (five to seven strips one way, five to seven the other, basketweave pattern if desired), trim ends if needed, then fold under edges and crimp decoratively.
If desired, brush crust with egg/water wash or with water and sprinkle with coarse sugar.
Bake:
Place pie plate on baking sheet (lined with foil if desired) to catch drips.
Bake at 400 degrees for 20 minutes, reduce heat to 350 degrees and bake until pie is golden and filling thickens about 1 hour and 25 minutes.
Transfer pie to cooling rack and cool completely.
Originally posted to The Grub Report by Patricia Gibson on Wednesday, October 29, 2008 6:45 PM EDT
This week's ingredient could be in the running for one of the most underappreciated items in the produce section.
Like their cousin the carrot, parsnips shine in both sweet and savory settings. They certainly are one of things that have quite a strong fall feel, but they can be a year-round addition to the table.
When the fall and winter holidays roll around, however, I'm always reminded of my love for parsnips. The pale, sweetly earthy root veggies always seem to pop up on my Thanksgiving menus.
This year they were showcased quite beautifully in a recipe I found in a cookbook that was gift last year from Steve's mom, The Gourmet Cookbook: Parsnip Apple Puree. It was a perfect pairing with the turkey. Don't mind the gravy, just pile on the parsnips, please!
But the best way I can think of to introduce the parsnip to those unfamiliar with its distinctive flavor is as a twist on that old staple carrot salad.
According to epicurious.com, we have the Moroccans to thank for putting this dish on the map.
But my favorite incarnation is what's sometimes billed as Southern-style. It can incorporate just about any add-in that strikes your fancy (or whatever you have on your shelves). The foundation is, quite simply, carrots and a mayonnaise-based dressing.
Here are the basic proportions, but you can vary it to suit your preferences.
Carrot-Parsnip Salad
Ingredients
1 pound carrots, peeled and shredded or grated
1/2 pound parsnips, peeled and shredded or grated
3/4 cup or more of add-ins (see list of suggestions below)
1/2 cup mayonnaise
1 tablespoon Miracle Whip, or to taste (Note: If you don't have Miracle Whip, use granulated sugar to taste. You want the dressing to have a tinge of sweetness.)
salt and pepper to taste
Instructions
Mix carrots, parsnips and your add-ins together.
In a separate bowl, mix mayonnaise, Miracle Whip (or sugar) and salt and pepper together until well blended.
Fold dressing mixture into carrot mixture. If mixture is too dry or too wet, adjust proportions accordingly. (Add more mayo if it's too dry, more carrots if it's too wet. But remember, if you let the mixture set, it will get more soggy.) Then you're ready to serve.
Add-in ideas
-- The standby is raisins, and they're perfectly tasty. But you can also try golden raisins or some of the more "gourmet" raisin mixtures out today.
-- Other dried fruits, such as apricots or dates or even pineapple, chopped into small bite-sized pieces. (Canned pineapple can also be nice. Just make sure you drain it well and chop it up.)
-- Nuts, such as pecans, walnuts or pistachios.
-- Dried shredded coconut.
And we'd love to hear of any other combos you come up with!
Originally posted to The Grub Report by Patricia Gibson on November 28, 2007 11:33 PM
Comments
At November 30, 2007 12:40 AM, James Cramer said...
When I was traveling in France it seemed like pureed parsnip was served with just about every lamb or beef dish I ordered. Just sitting there like a soggy pool of wet mashed potatoes. I did start to kind of like it as a condiment for the meat, sort of like a creamy horseradish. But I never did develop a full appreciation for the carrot's poorer cousin.
At December 4, 2007 2:27 PM, marti mckelleb said...
My experience with growing my own parsnips is that the soil is most important. We raised the pale yellow parsnips in the '70s, and they tasted as though you had soaked them in honey. Yummy. So perhaps the European soil is depleted. I did rather like the parsnips I had in Budapest. And also the rutabagas.
THE GRUB REPORT: Out of candy corn? Make your own!
For me, the days and even weeks following Halloween are a series of sweet surprises, each one striped in orange, yellow and white. Yup, candy corn is probably the most iconic of autumnal treats, and for the three weeks before and after October 31st it's hard to get away from (not that you'd want to).
Yes, like freeloading grains of sand after a beach bash, candy corn have a habit of popping up in the most unlikely of places and well after the party's over. Don't get me wrong. I love it. That last sweet morsel desperately clinging to the bottom of your plastic jack-o-lantern? That errant wedge hiding behind the coasters? They're all fair game, and each one provides a small, unexpected bit of pleasure in the ever-shortening days of November. But, as we all know, even the simplest pleasures cannot last forever.
Sadly, by the time you realize that you've discovered and devoured the last of the hidden booty, it becomes next to impossible to buy more. The gargantuan packages that were so abundant on store shelves just a month before have gone the way of the dodo, and you're left wishing you had savored that last piece to its fullest. It's a nagging feeling that can leave you empty for a full 12 months.
With this in mind, I thought I'd link to a recipe for homemade candy corn so that others might not have to endure this pain. But first, couple of caveats before you attempt this recipe:
To achieve a flavor closer to that of traditional candy corn, I might suggest cutting the corn syrup in half and replacing it with 1/3 cup of honey.
Also, to achieve the classic three-stripe look, wait until your dough has come together, divide it into three equal portions and knead the food coloring into the dough. Roll the portions into individual ropes and flatten with your rolling pin.
Finally, don't panic if you taste them right away and they're a bit off. Give them time to sit. I'm convinced that one of the primary agents in flavoring the candy corn we know and love is time. You know they've had plenty of time to sit and develop their flavors on the shelf — maybe since last Halloween!
We're always looking for something new to try, so when we come across an appealing idea or recipe, we'll tuck it away for a weekend, when we often spend a little extra time cooking together.
Last Sunday, though, was an end to a long week, so we were both thinking pizza. (I wanted takeout, Steve was thinking frozen.)
But then we remembered we had some homemade tomato sauce in the freezer, from a summer surplus of tomatoes in a family member's garden. And that got us to thinking. Why buy a pizza when we could just throw together our own?
At first I lamented that ingredients would likely cost us more than buying a frozen pizza, but the more we thought about ingredients we had on hand already, the more I liked the idea.
We had the sauce.
We had ricotta (which I've already established is one of my favorite ingredients -- we like to drain it a little and use small globs of it on pizza, something we learned to love at a gourmet pizza joint in Indy).
We had a wedge of parmesan cheese (though we ended up swapping it with some shredded cheeses).
So we took a quick spin through the grocery to add to the stockpile:
-- A tube of pre-made pizza dough (which we drizzled with hearty olive oil once we had it spread out in the pan and ready to bake).
-- A tub of sliced baby portabello mushrooms (which we opted for because they were the same price as the sliced white button mushrooms but pack a little more flavor).
-- A package of sliced soprasetta, a peppery type of salami made with pork and, in this case, at least, wine. It was everything good about salami but with just the right tanginess. Marvelous!
-- A couple bags of shredded cheese (mozarella, of course, and a blend of five different types dubbed "Italian").
-- A red onion (which we used about half of, sliced thinly).
All in all, the bill (when you take into consideration that we used only a portion of most of the ingredients, and not counting the ingredients we had on hand) came in under $5. Where can you get a gourmet-style pizza for that price?
Originally posted to The Grub Report by Patricia Gibson on October 30, 2007 12:10 AM
Comments
At November 1, 2007 11:24 AM, Angie said...
We make pizza at our house each Friday night... I like the idea of using dabs of ricotta along with the mozzerella - thanks for the idea! (We use it in lasagna, and I like the other ideas you shared a few weeks ago, but I hadn't thought of pizza. Yum!)
THE GRUB REPORT: Out of the dirt and into your oven
For some time now, I've been interested in the idea of cooking in an "earth oven." Also known as pit roasting, it's a process that's been around since the dawn of man but has recently enjoyed a bit of notoriety thanks to those travelogue/cooking shows that are so prevalent on cable. You've surely seen it before. One of the big celebrity chefs heads out to some remote Pacific island or South American locale and partakes of a feast prepared right there in the dirt.
It's labor intensive, primal and, most importantly, supercool. The only problem is that I imagine the neighborhood association would probably have something to say about a gargantuan, smoking hole in my front yard.
In a quest to bring pit roasting into my home kitchen, I looked at a number of recipes, trying to find one that I thought might accurately replicate the flavors of slow cooking meats in the earth.
In the end, I settled on a classic pork dish hailing from the southernmost states in Mexico, cochinita pibil.
Like another of my favorite dishes, carnitas, the brilliance of cochinita pibil lies in its simplicity. I'm a firm believer in the fact that you can never go wrong with simple, slow roasted pork, but this recipe goes one better. The pork in this dish is complimented beautifully by being steeped and then cooked in a spicy-sour marinade of citrus juices and annatto.
Annatto is peculiar in that it seems like a rather exotic spice, but in reality you probably consume a great deal of it every day. Due to their vibrant red hue, annatto seeds are commonly used as a food coloring and even in the production of many cheeses. The flavor of annatto is fairly mild, yet a bit sweet and peppery.
As a side note, the banana leaves are not essential to this recipe. It would certainly still be a delicious meal prepared inside a tinfoil pouch, but if you can find them (usually frozen) I suggest you give them a try. As the leaves begin to dry, they impart a faint smokiness to the meat that gives it a flavor that is closer to pit roasting than any other home cooking technique can achieve. (As seen in the photo above, banana leaves are big, beautiful, fragrant things. You'll probably have to get them at an international grocery or special store. Sometimes they can be found fresh, but we used frozen ones and they worked beautifully.)
1/2 stick cinnamon 8 garlic cloves 1 cup orange juice Juice of 1 lemon 1 tsp. salt 1 boneless pork shoulder 1 package frozen banana leaves (optional)
Combine annatto, oregano, peppercorns, cumin, coriander, cloves and cinnamon in a grinder and pulse until the spice mix is fine and thoroughly mixed. (The fine grind is important; you don't want chunky spices to stick in your teeth, do you?)
Add the spice mix, garlic, orange juice, lemon juice and salt to a blender, and blend until the marinade is smooth.Cut the pork shoulder into two-inch cubes. Place the pork into a gallon storage bag with the marinade and shake to combine. Allow the pork to marinate over night (at least six hours).
Preheat your oven to 350 degrees.Line a roasting pan with the banana leaves (or tinfoil), leaving enough hanging over the edges to cover. Pour the pork and marinade into the center of the lined pan and fold the leaves over the meat. Cover the roasting pan with tinfoil, making sure it is sealed tightly.
Place the pan into the oven, and roast for six hours or until the pork is extremely tender.
Serve with warm corn or flour tortillas and habanero salsa.
Originally posted to The Grub Report by Steve Gibson on October 5, 2007 06:01 AM
THE GRUB REPORT: Ingredient of the week: Ricotta cheese
This week's choice was actually inspired by my last pie escapade.
(I had enough crust dough for two pies, so a few days later I made one of my favorites, the one that the pie crust recipe I used actually goes with.)
Ricotta cheese shows up in many Italian favorites of mine. Manicotti. Ravioli. Lasagna. Cannoli.
And it played a supporting role in an the Ingredient of the Week recipe for fresh figs a few weeks ago.
It's a very flexible ingredient that pairs well with many different flavors, savory and sweet. But it is the star of the show in this week's recipe, Ricotta Pie.
Oddly enough, this dish was added to my repertoire after being mentioned on The Sopranos many years back.
Ricotta Pie (prounounced ri-goat, apparently, by authentic, or psuedo-authentic, Italian-Americans) was one of the standard features in the family's -- or is that Family's -- menu. So we decided to make one of our own. From the first bite, it became one of my favorites. It has tinges of the familiar cheesecake taste, but with a decidedly different texture, far less creamy. And it just tiptoes onto the sweet side, like its cousin the cannoli, another ricotta-based pastry. The original recipe I found (and as usual have forgotten exactly where) had chocolate shavings included in the filling, but we've since opted to forego those, finding they didn't add much to the final product.
The crust is one of the more unusual I've made. It's very tender, to the point that you have to take great care when transferring it to your pie plate. But the result is a subtly sweet crust much more like a crisp, delicate pastry than the solid crunch of a typical pie crust.
Directions (Crust) Place flour in large bowl. Cut shortening into flour until mixture resembles coarse meal. Mix in the one beaten egg, milk and vanilla extract, stirring just until combined and dough forms a ball. Separate 1/3 of the dough.
On well-floured surface, roll out bigger portion into a 12-inch circle; transfer carefully to 9-inch pie pan. (I've found that the usual method of rolling the dough onto the rolling pin to transfer to the pan does not work well with this fragile dough. I fold the circil in half, then in half again and transfer to the pan, then unfold.)
Preheat oven to 325 degrees.
Retrieve smaller portion of dough from refrigerator, and roll into a rectangle. Cut into strips, and reserve for top of pie.
(Filling) In a large bowl, mix ricotta, sugar, salt and five beaten eggs. Spoon or pour into pie shell. Use strips to form a lattice on top.
Bake in preheated oven for 90 minutes, or until a knife inserted into the filling comes out clean.
Cool before serving, and keep leftovers refrigerated.
Originally posted to The Grub Report by Patricia Gibson on September 9, 2007 07:55 PM
THE GRUB REPORT: Ingredient of the Week: Fideos (With Video!)
A few weeks ago, Tricia and I were browsing the aisles at a local discount store and were surprised by the selection of food they carried. Not by the quantity, mind you, but by the variety. Because they primarily stock those items that have failed to sell elsewhere, the food offered runs the gamut from exotic to inedible.
Intrigued by the notion of purchasing foods available at a discount store, I thought it would be fun to try to make a tasty meal exclusively from discounted items. Sure, the odds were not in my favor, but in the end … well, I'll let you decide. Here's the video. I'm calling it "Dollar Store Gourmet."
Ingredients 2 7-oz. packages fideos 1 medium onion, sliced 2 cloves garlic, minced 2 Tbsp. olive oil 1 14-oz. can chicken broth 2 13.7-oz. packages crushed tomatoes 2 3.5-oz. packages whole baby clams 1 tsp. kosher salt 1 tsp. paprika ground black pepper to taste
Directions
Bring olive oil to medium heat, and add fideos. Sautee until they are golden brown, and drain on paper towels.
In the same pan at medium heat, add garlic, onion, tomatoes, salt, pepper and paprika. Let it simmer for 15 minutes.
Add broth and the reserved fideos to the pan and let simmer for an additional five minutes.
Add baby clams (along with juices they are packed in) into the pan, and simmer for an additional 10 minutes. Remove from the heat.
Preheat broiler, and spoon the fideos into oven-safe bowls. (The flatter your bowls, the more surface area will be exposed to be crisped up.) Place bowls beneath broiler until tops of fideos are browned and crispy.
Originally posted to The Grub Report by Steve Gibson on August 4, 2007 12:59 PM
Comments
At August 10, 2007 10:50 PM, Bill Lewis said...
Steve Gibson, I think the video is a great idea. Permit me to cite a previous article that suggested ordering specialty food items over the Internet. For example, someone wanting to try your recipe for fideos with clams may be hard pressed to find fideos locally (maybe La Poblanita?). I've used Amazon.com on a few occasions and discovered they have a large variety of specialty foods and ingredients. However, I'd advise your readers to be careful, since the shipping costs can sometimes be more than the item ordered. Your recipe contains two of my favorites, pasta and clams.
As an aside, one of my favorite restaurants in the whole world is Umberto's Clam House in New York City. They serve the best linguine with white clam sauce on the planet.(It's in the New York City dining guide and is located in the center of Little Italy. If anyone is traveling to NY I'd recommend it). Umberto's has been prospering in NY for over thirty years. That says something for a city that is very hard on the restaurant trade. Food critics rule and new restaurants come and go overnight based on their reviews. After moving back to Marion, I discovered that there must be a cosmic gazillion varieties of tomato sauce in the local markets, but no white clam. After a quick search I was able to locate a large selection on Amazon.
Your idea of "Dollar Store Gourmet" was very good. Maybe next you can try "Gourmet Recipes from Our Sisters of Charity Soup Kitchen". (Just joking)
At August 12, 2007 7:25 AM, Scott Hutcheson said...
Love the video and love the "Dollar Store" concept!
Last Sunday at church, some friends brought in a grocery bag full of zucchini big and small, overabundance from their garden to share.
We love zucchini, so we took a few.
But what to do with them?
It figures into one of our favorite one-pot meals, chicken, rice and vegetables with a Moroccon flare.
And back in May, Angie suggested a veggie variation on crab cakes that puts a new spin on zucchini.
Of course, there's always the old standby, zucchini bread.
But there's a recipe I've been wanting to try for months, or even years: zucchini pie.
I'd never heard of this concoction util I attended my first Mississinewa 1812 a few years back. This annual fall festival / living history event is one of my favorite things about Grant County, and the turkey noodle soup and squash pie served by one of the vendors is one of the highlights for me.
The first time I tried that squash pie, I vowed I'd make it someday. Today was that day. I had scrounged for recipes online the last time I had the urge to make this dish, but I can't remember which site I ended up pulling this one from. (My guess is Cooks.com.) I used some others there for reference today, trying to come up with the best way to replicate those flavors I savor every fall out at the battlefield.
I think this one had the best formula and best directions, except for one thing. It doesn't have a total cooking time. It just instructs the baker to "cook until set."
I've baked many a pumpkin pie in my life, and since this is a custard pie that's somewhat similar, I figured I'd have no problem. I was wrong. My pie came out just this side of burnt, and the texture of the filling verged on curdled. (In my defense, I had to leave it in a warm oven so as not to be late for work, because it still seemed to jiggly to remove. I think that was what pushed it over the edge.) But the taste! It was just what I was hoping for!
So next time, I'll know that "set" for this pie is still rather loose. It's more runny than your typical pumpkin filling, and the end result should be far less dry. Now I know. In the meantime, I'll be enjoying my not-quite-perfect pie anyway.
Here's the recipe I used:
Zucchini Pie Ingredients 1 1/2 cups zucchini - peeled, seeded and sliced 1 cup evaporated milk 2 cups white sugar 1 egg 3 tablespoons margarine or butter 3 tablespoons all-purpose flour 1 teaspoon vanilla extract 1 pinch salt 1 recipe pastry for a 9-inch single crust pie (or a store-bought crust) 1/2 teaspoon ground cinnamon 1/4 teaspoon ground nutmeg
Directions Boil zucchini until tender. Drain and let stand in cold water for about 5 minutes, then drain. (Alternately, spread out on a heat-safe surface and let cool, which is what I did while I was making my pie crust dough.) In a large bowl, combine zucchini, evaporated milk, sugar, egg, margarine, flour, vanilla and salt. In two batches in a blender, blend until smooth. (I tried to put it all in the blender at once, as the original recipe said. Boy, what a mess I made!) Pour into unbaked pie shell. Sprinkle with cinnamon and nutmeg. Bake at 425 degrees farenheit for 5 minutes. Reduce heat to 325 degrees and bake until set. (And remember, this is a very loose set. It will still be very jiggly, but it will firm up in the refrigerator. Next time, I'll start with about 45 minutes, and go from there.) Do you have any recipes you turn to when you have extras from the garden?
Originally posted to The Grub Report by Patricia Gibson on August 2, 2007 11:34 PM
When I'm at the grocery, I often find myself grabbing exotic items even though I have no real plan as to what I might do with them. It's due to the transient nature of the produce section at local groceries. What's here today might not and probably won't be here tomorrow.
So, you have to forget about planning meals ahead of time. You gotta get what there is to be gotten now and figure out a way to use it later. Such was the case when I happened upon a display of lychees.
Lychees are native to China and a staple of many Asian cuisines. They have a tough skin that's easily removed to reveal a somewhat fibrous white flesh. Their taste is a bit musky and unlike any other fruit that I can think of.
Since my experience with lychees has been exclusively in the realm of Thai cuisine, I felt like I should incorporate some of the classic flavor combinations from the region. Red snapper is pretty abundant in the Indian Ocean, and in Thai cuisine it is often paired with citrus or chilies to contrast its delicate flavor.
In our recipe, we forgo the citrus in favor of lychees in order to give the dish a subtler, more complex flavor.
Red Snapper with Lychee Chili Sauce
Ingredients Sauce 1/3 cup lychees, chopped 2 shallots, chopped 1 red chili, seeded and chopped 1/2 inch ginger root, peeled and chopped 1 tsp. brown sugar 1 Tbsp. fish sauce (optional)
Fish 4 red snapper fillets 4 Tbsp. soy sauce 1 Tbsp. vegetable oil 6 scallions, sliced 2 Tbsp. cilantro 1 red chili, seeded and sliced lengthwise
Sauce Combine lychees, shallots, red chili, ginger root, brown sugar and fish sauce in a blender. Blend until the mixture is smooth.
Fish Cut four or five shallow, diagonal slits on the skin side of your snapper fillets and place them in a shallow pan.
Coat both sides of the fish with the soy sauce. Heat the oil in a large frying pan, and fry the fillets, one at a time, for five minutes on each side, or until the skin is browned and the flesh is tender and flaky.
Spoon the lychee chili sauce over the fillets and garnish with cilantro, scallions and red pepper strips.
Originally posted to The Grub Report by Steve Gibson on July 19, 2007 08:43 PM
Comments At July 21, 2007 12:10 AM, Bill Lewis said... Steve Gibson, that looks like a very good recipe. I'm going to try this one if I can find some red snapper. I've seen lychees in the market. My first taste of Asia, in Asia, was dried lychee "nuts" usually served with other appetizers during the pre-dinner cocktail hour(s). (I was "immersed" in Asian culture almost immediately after graduating from college and leaving Indiana. My first assignment was in East Asia where I spent an interesting thirteen months.) Fresh Lychees were usually included in fruit salads during the summer months. I always thought they tasted, and the fresh ones resembled, strawberrys.
At July 22, 2007 11:12 PM, Steve Gibson said... Bill, I love hearing about your travels and hope one day to have the opportunity to visit some of these places myself. Oddly enough, I discovered lychees at a Thai restaurant in Minnesota. It was the same day that I discovered the fruit called, "durian." They told us that we didn't want it, but that just made us want it all the more. I know now that they were right. They brought it out and it smelled like an open sewer. I guess in Thailand they actually have banned the eating of durian on the subway due to the stink! Yeah, I think I'll just stick to the lychees.
At July 25, 2007 2:46 PM, Bill Lewis said... Steve Gibson, I'm hesitant to relate my travel/culinary experiences for fear it will be interpreted as bragging. I can assure that is not my intent. My job(I'm retired) required a lot of travel. The job related travel, in addition to my personal trips, have taken me almost around the world (literally). I've not heard of "durian" but based on your description that is a culinary experience I will avoid. Of a similar nature Korea has a national dish called kimchi. It consists of fermented vegetables and is usually heavily seasoned. The smell alone is enough to discourage any casual American tourist from sampling it. In this particular case I will say "thank God for McDonalds in East Asia (not Europe). I really enjoy your Blog and thanks for permitting me to provide my small contribution.
Okay. I admit it. We fudged on the rules a little this week. Our beautiful fresh figs came from one county over. But when I saw them at a grocery store in Muncie, I just couldn't pass them up. Fresh figs are one of those foods I covet. There's just nothing like them. The dried or Newtoned varieties are fine, but they can't hold a candle to the sublime smell, taste and texture of the fresh fruit, in my book.
I remember the first time I had a fresh fig. It was straight from the tree in the back yard of my uncle's parents, immigrants from Italy who had settled in California. I've loved them ever since. The figs we found were the deep purple, plump, teardrop-shaped Mission variety. They came five to the package, piled in one of those ubiquitous plastic hinged-lid produce boxes. And when my family came up for a visit last weekend, it was the perfect opportunity to make a simple, fresh dessert that showcased the figs.
I picked up a small tub of ricotta cheese (another of my favorite ingredients) from a local grocery and used about half of it, and I pulled out the tarragon (one of my favorite herbs) that was in our fridge, left over from a batch of tarragon butter that accompanied steaks we grilled recently. I also had to pick up a new bottle of honey, and opted for the darker (and consequently cheaper) version, because I wanted a heavier flavor.
The resulting dish was nothing short of divine. Or at least my dad -- from whom I must've inherited my love of figs -- and I thought so. I have to admit that the rest of the group were underwhelmed. The reviews ranged from "It's OK" to "It's weird." So if you find fresh figs and try this concoction, you'll probably get mixed reviews, too. But you may just find that you, too, will become a fig devotee and dream of the day when you'll get the chance to enjoy them again.
Here's the recipe:
Fresh Figs, Tarragon Ricotta and Honey Ingredients Fresh tarragon leaves, roughly chopped (I'd estimate it was a teaspoon or a little more, but you could vary it to your taste) Ricotta cheese (about half a small tub is enough for five figs) Fresh figs (any variety will likely do, but Missions work great with this flavor combo) Brown sugar (about a half a teaspoon per fig, or more if you wish) Honey (enough for generous drizzles across each portion)
Instructions Mix the tarragon into the ricotta, preferably a few hours before so the flavor infuses into the cheese somewhat.
Set the oven to broil. Slice the figs in half from top to bottom, and place them on a sheet pan or any oven safe dish. Sprinkle generously with brown sugar, and broil for a few minutes. (Time will vary from oven to oven. Just make sure you keep close watch on them. You want the sugar caramelized, but the difference between that and burnt is a matter of seconds.) Let cool while you prepare the plates.
Spoon cheese onto plates. (Quenelles are a nice way to go, but any neat mound or dollop will do, really.) Place the figs next to the cheese, and generously drizzle all with honey.
Do you have any foods you love but can't often find? Or do you have any memories of the first time you tried a favorite food? We'd love to hear about them.
Originally posted to The Grub Report by Patricia Gibson on July 11, 2007 07:30 PM
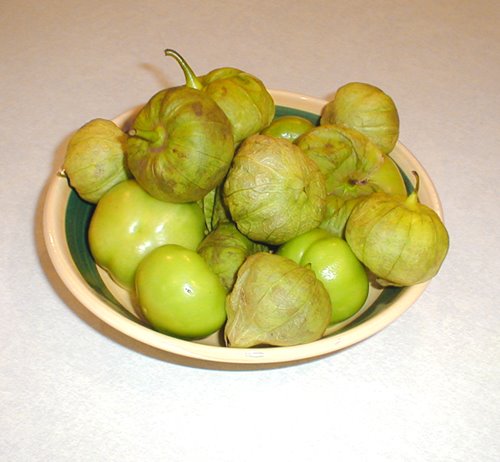
THE GRUB REPORT: Ingredient of the Week: Tomatillos (plus a video!)
Blogging each week on a specific ingredient has helped me grow accustomed to explaining my purchases when I reach the checkout at the grocery. It never fails. The cashier can be completely zoned out and ambivalent to my presence, but as soon as they get to that one moderately obscure item, they wanna know all about it.
This week, I had resigned myself to the fact that I'd most likely not get to have my little food chat with the cashier. Tomatillos, after all, aren't exactly exotic, right? Well, to tell you the truth the cashier showed more interest in my bag of little green spheroids than I have ever been confronted with. She asked a few questions about them, and I did my best to answer them.
Then, the bag boy also got in on the action, asking what they were and what I was going to make with them. It was a little bit awkward, and I began to feel as though people were craning their necks to see what kind of alien produce I was buying. I am truly convinced that if I would have stayed long enough, they would have called the manager over to marvel at them for a while.
I guess it's pretty cool that people are interested in learning more about foods they might not immediately reach for on their own. Honestly, though, tomatillos shouldn't be that scary. As the name implies, they are related to the tomatoes you and I slice up for our burgers, but admittedly have a look and a taste that's very different. While they are usually covered in a dry, brownish husk, the actual fruit of a tomatillo is (or should be) brilliantly green and firm. (It's actually in its unripe stage, but that's when it's best.) The fruit has a fresh, tart flavor that lends well to a variety of applications (one of my favorites is a pork loin recipe from Emeril: Bam! ); the most traditional use of the fruit is in salsa verde.
While salsa verde can mean any variety of green sauces used south of the border, the most popular use of the term refers to the sauce made with tomatillos. Similar in many ways to the red salsas made with tomatoes, salsa verde has a much brighter, tart flavor.
Feel free to switch out this salsa verde in just about any application where you'd use standard salsa, including but not limited to sitting on your couch with a bag of Tostidos.
Salsa Verde
Ingredients 4 cups tomatillos, husked, rinsed and diced 1 medium onion, diced 4 cloves garlic 1/2 cup chopped cilantro 4 jalapeno peppers, seeds removed 1 tsp. salt
Directions
Roast the jalapenos under the broiler (find the tutorial here)
Combine all of the ingredients in a food processor (or in a bowl if using an immersion blender) until pureed.
Cover and refrigerate.
So, I suppose you're wondering if salsa verde is available at the grocery, in jars just like the red stuff we love so much. Of course it is, but the real question you should be asking is whether or not it's as good as the homemade.
Well, we've decided to do the taste test for you. Check out our very first video (yup, I said first ... so be gentle) wherein we pit store bought salsa verde against our very own recipe in a no-holds-barred bout that I'm calling "Supermarket Death Match."
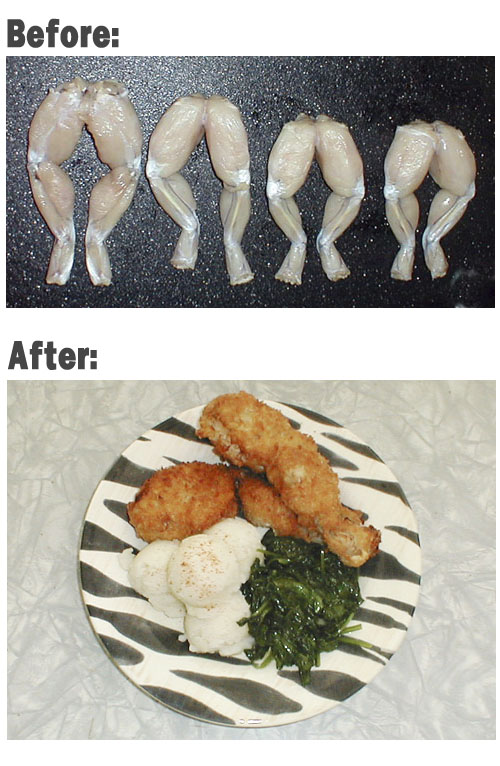
THE GRUB REPORT: Ingredient of the Week: Frog Legs
It's ironic that what's available in our own backyards is often considered exotic eats. I'm constantly spotting snails sliming their way up and down our deck, but I have yet to work up the nerve to break out the garlic butter and enjoy some escargot. And while I get downright angry at them eating our tomatoes, the idea of stewing up a cute and fuzzy bunny for a little hasenpfeffer nearly brings a tear to my eye.
Why do we shy away from snacking on those critters that are so readily available? My guess is because they aren't available at our local mega-marts and we are so disconnected from the preparation of our own meats that we'd never think of doing it for ourselves.
Come to think of it, that's probably smart. While many decry the modern grocery as the reason that "we don't know where our food comes from," it has most likely contributed to the longer life-expectancy we enjoy these days. To be quite honest, I'd rather go through life believing that meat spontaneously appears shrink-wrapped on polystyrene trays than wind up raving mad after gnawing at the hind quarters of a sickly animal. So, it's probably best to let the backyard beasties be until such time as they appear at your local meat counter.
For me, that day came sooner than I expected. The other day while cruising the grocery aisles I came across an oddly beautiful sight. It was a chorus line of hefty frog legs looking like they were ready to begin high kicking to the strains of "Hello Ma Baby". I had never tried them, but I knew that they were considered a delicacy in many cultures.
The cuisines of France and China have a tradition of using frog, but around here, if you wanna do frog legs right, you gotta go south. Our recipe is essentially a variant on southern fried chicken. I mean, what do you always hear? It tastes like chicken, right? We actually thought the flavor, and texture for that matter, tended more toward fish. Regardless, we hope this recipe will serve to simultaneously put the squeamish at ease and please the most diehard frog fans out there.
Southern Fried Frog Legs
Ingredients 4 frog legs 2 cups buttermilk 1 cup all-purpose flour 1 tsp. Old Bay 1/4 tsp. garlic powder 1/4 tsp. onion powder 2 tsp. salt 1 tsp. black pepper 2 eggs, beaten 2 cups panko bread crumbs (*see note below) vegetable oil (for frying)
Directions:
Pour buttermilk into a bowl and add frog legs to marinate for at least one hour. Toss once or twice to ensure a good soak.
Mix flour, Old Bay, garlic powder, onion powder, salt and pepper.
Remove the frog legs from the buttermilk, and dredge in the flour, then in the beaten eggs and finally in the breadcrumbs. Set the legs to the side while you preheat the oil for frying. Once the oil is heated, fry the legs on both sides until they are evenly browned (approximately 6 to 8 minutes).
*A note about panko: Panko -- often stocked in the small Asian staples section at grocery stores -- is a Japanese-style breadcrumb that is more coarse and flaky than the breadcrumbs you might be used to adding to meatloaf and the like. It is fabulous for breading, and will make a real difference. If you can find it, use it. You'll be glad you did.
Originally posted to The Grub Report by Steve Gibson on June 20, 2007 03:11 PM
Comments At June 22, 2007 11:09 PM, Bill Lewis said...
Steve Gibson, great article. I can remember my dad cooking frog legs when I was a kid here in Marion. One bit of advise though, you may want to cut the Achilles tendon before sauteing. They have a tendency to "jump" while being cooked because of the expansion of the tendon. This "jumping" could scare the poop out of a novice chef.
Your chicken recipe looks very good. There is a French version for "Cuisses de Grenouille aux Herbes" that calls for drenching the legs in flour and sauteing in butter and garlic until brown and served with parsley. Detailed recipe may be available on-line.
I tried Escargot in a small bistro in Montmarte(northern Paris) called Le Cirque. (I could not leave France and say I had not tried Escargot.) They were fabulous. I think the taste comes more from the garlic and butter sauce than the snails themselves. Both Escargot and Grenouille are generally served as appetizers in French restaurants.
Speaking of local delicacies, what about the Morel mushroom, which grows wild in this part of Indiana. We used to "hunt" them in the woods around Marion but we referred to them by another name. (A name which is too obscene to print.) We would soak them in salt water overnight to get the bugs out of the cells. They are fantastic sauteed in butter and garlic.I noticed they had them in Marsh for almost $50 a pound. Talk about sticker shock.
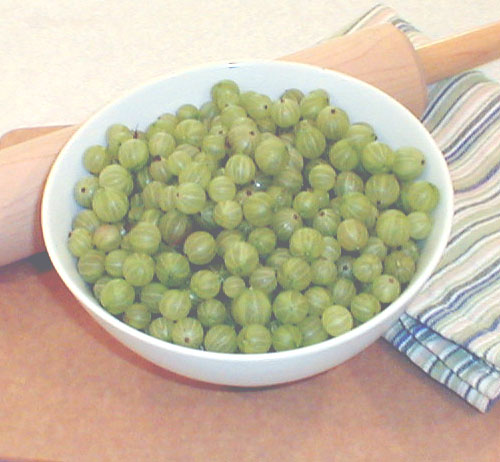
THE GRUB REPORT: Ingredient of the Week: Gooseberries
As a kid, I loved gooseberries. So sweet, so succulent, they were my favorite part of the canned fruit cocktail we often enjoyed as dessert. While the fruit ratio was obviously skewed to encourage the coveting of cherries, it was always the pale green orbs that I kept in my bowl to savor after everything else was gone.
A few years ago, I had the opportunity to assist in the baking of a gooseberry pie and couldn't resist the urge to pop one of the beautiful berries in my mouth. In about a sliver of a nanosecond, I realized that something was wrong. These were not the sweet and succulent treats of my youth. No, these seemed more like little caplets of battery acid; sour beyond all comprehension. And my mouth, completely independent of my brain, decided to evict the fruit.
With my mouth agape, my face twisted in abject horror, and (with gooseberry innards dribbling down my chin) I was the laughing stock of the kitchen. I had inadvertently revealed my ignorance of the fruit known as the gooseberry.
As you probably already knew, what I grew up thinking were gooseberries were, in reality, grapes (made tastier by steeping in heavy syrup). And the implosion of my tongue upon meeting with an actual gooseberry will always stand as a harrowing reminder to question bizarre and often downright incorrect hillbilly nomenclature I grew up with in the kitchen. (Not to get too far off topic, but another hard lesson learned involved the difference between mangos and green peppers.)
Despite the pain and distress dealt to my mouth, I did discover that, prepared correctly, gooseberries can be a beautiful thing. So, when a big bag of fresh berries came my way over the weekend (Tricia's mom looks out for us like that) I knew right away that this week we'd be making a pie.
I know that you can pick up gooseberries canned in a syrup, so please be aware that this recipe calls for fresh berries. Using all of this sugar with the canned berries would most likely cause your teeth to disintegrate halfway through your first slice.
Also, you should know that before you get to the fun stuff, you have to pull the stems and tails off of each ... individual ... berry. It's a bit tedious, but worth the effort.
It took me just a hair less than an episode of SVU to do a quart of berries.
Finally, a note on crust. Everybody has their favorite recipe. For a basic crust we often turn to a Pillsbury cookbook that we've had for years. But there is no shame in getting a little assistance directly from the Dough Boy himself. Crusts from the refrigerated section of your grocery are surprisingly flaky and infinitely easier than rolling out your own.
Cut stemmed gooseberries in half. Mix berries and sugar in a saucepan over medium heat. Stir until sugar is dissolved and mixture is clear (about five minutes). Stir in tapioca and simmer for five minutes. Stir in butter and nutmeg and allow the mixture to cool.
Preheat oven to 400 degrees. Fill a 9-inch pie crust with the filling and cover with a second 9inch crust. Press to seal the crust edges and cut slits in the top to vent. Bake for 20 minutes, then cover the edge of the pie with foil. Bake an additional 30 minutes.
Originally posted to The Grub Report by Steve Gibson on June 14, 2007 03:45 PM
Comments
At June 16, 2007 8:55 AM, Misty Henry said...
Lol, my grandmother in Logansport had a bush of these growing in her backyard-I got ahold of one just one time, and had the exact same response! So when you started out that they were sweet, I was really confused! I had to laugh at your experience with them.
At June 17, 2007 11:56 PM, Bill Lewis said...
Your comment concerning the confusion over mangos and green peppers brought back memories. I was born and raised in Marion and many people,when I was growing up, referred to green peppers as mangos. I left Marion and worked on the east coast for over thirty years. One of the first, of many, misconceptions I was corrected on was the definition of a green pepper and how it was completely different from a mango. I wonder how they became confused in the first place?
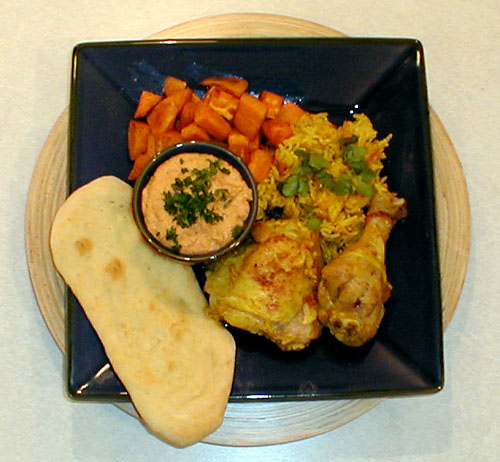
THE GRUB REPORT: Ingredient of the Week: Curry Paste
I know a lot of people have a hard time keeping up with the tech jargon that permeates our culture these days. You should have heard me explaining the concept of a blog to my mom. It was an experience akin to berry picking in the Kalahari: exhausting and fruitless.
There's no denying that the rapidly changing vocabulary of the Internet age can be daunting for those not immersed in it, but even the vernacular of the kitchen, which would seem to evolve at a lethargic snail's pace, can be infinitely confusing.
I became aware of this the other day while I was jotting down a shopping list in the break room at work. "What kinda list ya' making?" a co-worker asked. I explained that I was going to be making curry, to which she grimaced, explaining that she "wasn't a fan of Indian food."
Right then it dawned on me that "curry" is surely one of the most confounding words in the lexicon of cooking. To some, like my friend, it means a particular blend of spices (usually featuring coriander, cumin and turmeric) common in the cuisine of India. To others, "curry" is simply a synonym for "stew," or a sauce-based meat dish. In the U.K., "curry" can mean a spicy condiment served with French fries, proving, once again, that the Brits really know how to take a great thing and make it thoroughly unappetizing.
In its broadest usage, "curry" is used to refer to a wide range of spicy stews and as such has come to describe a variety of South East Asian dishes that are flavored with ingredients that are wholly different than their Indian counterparts.
Today's featured ingredient, curry paste, isn't so much a single ingredient, but is a recipe that can provide a spicy base for a number of variations on Thai Green Curry. While most Thai cooks include a number of exotic ingredients in their curry pastes (lemongrass, galangal, kaffir lime leaves, etc.) exact recipes differ from cook to cook and are based upon what is readily available. With this in mind, I offer up my own recipe for Thai Green Curry in which we replicate the exotic flavors of South East Asia with items available right here in town.
Green Curry Paste Ingredients 1 Tbsp. ground coriander 1 Tbsp. ground cumin Zest of 1 lemon 1/2 cup cilantro leaves 1 2-inch piece fresh ginger, grated 1 tsp. lime zest 6 garlic cloves; minced 2 shallots; chopped 12 green serrano peppers, finely chopped 1/4 cup water 1 tsp. black pepper 1 tsp. salt Directions Combine all ingredients in a food processor or blender and puree until it reaches a smooth paste consistency.
You'll most likely have enough paste for four to five recipes. In order to maximize the life of your paste, I recommend putting it into an airtight container or storage bag and keeping it in your freezer.
The following recipe for Green Chicken Curry is meant to be simple. Feel free to experiment with this one and find your own preferences (I like green peppers in mine). While it was prepared with our homemade curry paste, it is also great with the canned stuff. But you just don't get the crisp, fresh flavor you get with just about anything you make at home.
Basic Green Chicken Curry Ingredients 1 can (14 oz) coconut milk 2 Tbsp. green curry paste 1 lb. chicken breast, cut into bite-size pieces 3 Tbsp. soy sauce 2 Tbsp. brown sugar 1 can (8 oz) bamboo shoots 1/2 cup frozen peas
Directions Stir coconut milk and curry paste together in a large saucepan. Simmer over medium heat for five minutes. Stir in the remaining ingredients and simmer for an additional 10 minutes. Serve over rice.
Originally posted to The Grub Report by Steve Gibson on June 7, 2007 10:00 PM
Comments At June 8, 2007 10:52 PM, Nicole Noffsinger said... Im not really big on Curry but I do love it on popcorn.
THE GRUB REPORT: Ingredient of the Week: Chickpeas
When I was a wee lad, chickpeas seemed to confirm that old proverb, "Three's a crowd." In the barbecue side-item staple, Three Bean Salad, they always seemed foreign to me. Sure they had certain bean-like qualities, but something just seemed off. It could have been the slightly firm texture. I could have been the spheroid shape. Either way, I was not gonna let them take up valuable paper plate real estate.
It wasn't until I reached adulthood that I came to realize chickpeas were never meant to play third fiddle to other, more recognizable legumes. In fact, they are probably the most noble of all beans, able to stand on their own as the featured player in a variety of dishes spanning cuisines from nearly every continent.
Around our parts you can usually find chickpeas (sometimes called garbanzo beans or chana) in both canned and dry varieties. Deciding which one is better for you comes down to a question of time. While preparing dried chickpeas is not labor intensive, it does take a fair amount of planning. So, the allure of the canned variety is understandable. Luckily, canned chickpeas are perfectly serviceable in many recipes (including our Roasted Red Pepper Hummus recipe at the end of this post), but providing you have the time, go prepare the dried beans. Your meal will benefit for the little extra you put in.
Preparing Dried Chickpeas:
The USA Dry Pea and Lentil Council recommends soaking your chickpeas overnight and then simmering them for 1 1/2- 2 hours in twice as much water as the amount of dried chickpeas used.
Our recipe calls for 2 cups of chickpeas, so that’ll be 4 cups of water, but feel free to make as big of a batch as you like. Chickpeas can be frozen in the water in which they are boiled and kept for about two weeks.
Roasted Red Pepper Hummus
Ingredients: 2 cloves garlic, minced 2 cups prepared chickpeas (or one 15 ounce can) 1 1/2 tablespoons tahini (sesame paste) 1/2 cup roasted red peppers (find a great tutorial here) 2 tablespoons olive oil juice from 1 lemon 1 tablespoon fresh parsley, chopped 1/4 teaspoon salt
Directions: In a food processor, puree the chickpeas, garlic, tahini, red peppers, olive oil, lemon juice and salt. Be sure to scrape the sides of your processor to make sure the hummus is well blended and smooth.
Transfer your hummus to a bowl and refrigerate the mixture for at least one hour.
Originally posted to The Grub Report by Steve Gibson on May 31, 2007 07:32 PM
Comments
At June 1, 2007 5:33 PM, Nicole Noffsinger said...
Anyone remember the Indian Resturant we had here in the old Marshall's video store on the bypass? They had the best Hummus! I remember not knowing what to try and my dad lathered a piece of bread with the stuff and omg it was great! I have never found any that rivaled the taste but it was awesome!
At June 3, 2007 1:15 PM, James Cramer said...
The funny thing is I always thought that the garbanzo beans were the best part of 3 or 4 bean salad. I grew up thinking that wax beans just weren't ripe yet and green beans should be over cooked, limp, and soggy.
However, I really liked the vinegar dressing, much as I prefer vinegar slaw to salad dressing slaw, so I ate it. I had no other reference for the garbanzo beans so I thought that bean salad was their only use. In college I ate hummus for years without realizing on what it was based.
Here is my suggestion for a very colorful summer salad that is quick and easy to throw together for last minute picnics. I love food with lots of different colors and now they say all the different flavonoids are good for you too.
Colorful Garbanzo Salad
Ingredients: Serves 6 2 15 to 16oz cans garbanzo beans, rinsed and well drained 1 large red bell pepper, diced 1/4-inch (if you double up the recipe, 1 red and 1 yellow) 1 3 to 4 oz can sliced ripe black olives, rinsed and well drained 1/2 cup chopped fresh cilantro (2/3 cup if you really like it) 1/4 cup extra-virgin olive oil 1/4 cup red wine vinegar 4 large hard boiled eggs, diced 1/2 tsp Kosher or Sea salt 1/4 tsp course ground black pepper
Directions: In a large mixing bowl, combine garbanzo beans, bell pepper, black olives, green onions and cilantro. Mix in oil and vinegar, then gently toss in eggs. Season with salt and pepper to taste and serve at room temperature.
At June 4, 2007 9:00 AM, James Cramer said...
Sorry, In the ingredients list I forgot that you'll want 6 medium sized green onions washed. Cut into 1/4" pieces tops and all.
Once a week, The Grub Report will focus on an ingredient we think more people should add to their plates.
This week's ingredient isn't all that exotic, but it certainly can be intimidating. So we'll let you in on what we found locally and how it fared in a recipe that's sure to impress your friends: crab cakes.
Seafood is always a bit of a crapshoot in our neck of the woods.
When availability isn't the issue, the question of quality always seems to turn you back to the dependable arms of a certain rain-slicker clad fisherman.
Of course, what we aren’t comfortable making at home we often seek out at local restaurants, forgetting that they face the same limitations we do. Sure, it may be called the catch of the day, but exactly what day is often a mystery.
What frozen, pre-packaged seafood gains in shelf life, it pays for in taste. Restaurants and frozen food companies may try to preserve flavor (and cut costs) with hefty breading or fillers, but the final product will seldom satisfy those seeking the briny goodness that is real seafood.
Despite the dearth of fresh crabmeat in these landlocked parts, I decided to embark upon a quest to create the best crab cake I could with ingredients readily available to me at local groceries. Yes, this means canned crabmeat, but before we go any further, it is important to distinguish between the varities of meat available and the different processes by which they are pasteurized.
Buying crabmeat is a potentially mind-boggling affair. Presented with upwards of five different varieties, many people are stumped as to which the best is suited for cake-ification.
Food elitists will tell you that lump or jumbo lump crabmeat (usually the most expensive) is the only meat that should be considered. In reality, a perfectly decent crab cake can be made from the pink or white varieties, but in my opinion it's the claw meat that makes the most sense when making cakes from canned crabmeat. The dark meat from the claws has a stronger flavor that, even after processing, is sure to ring through in your final product.
Aside from the different meat varieties, a shopper also has to consider whether he or she wants to buy shelf-stable crabmeat or a variety that must be refrigerated.
Those squatty six-ounce cans that fit so nicely in your pantry contain crabmeat that has been pasteurized at high heat for a significant period of time. As you would probably guess, flavor loss in this process is significant, but then again you'd probably be able to bequeath your crab stash to your grandchildren in your will.
Refrigerated crabmeat, on the other hand, has also been pasteurized, but at a much lower heat and for a shorter period of time. The process is much kinder to the meat in terms of flavor, but the fridge-life is reduced to a comparatively paltry 18 months.
Having experimented with different varieties of crabmeat available locally, I have come to the conclusion that best choice for crab cakes is the refrigerated claw meat available at your local fish counter. The taste and texture of the cake prepared with this crabmeat was just so much more pronounced than the cakes made with shelf-stable varieties. Plus, as an added bonus, it was actually cheaper to buy two eight-ounce cans of refrigerated meat than four six-ounce cans (read carefully, that's four ounces of dry weight, baby!) of pantry meat.
Without further ado, our recipe:
Brilliantly Simple Crab Cakes
Ingredients: 1 lb. crabmeat (that's 16 ounces of dry weight, don't forget) 1 egg, beaten1 teaspoon Worcestershire Sauce 1 1/2 teaspoon Old Bay (in the spice blends section at your grocery) 3 tablespoons crushed saltine crackers 2 tablespoons chopped cilantro 1/4 cup chopped green onion 1/4 cup mayonaise 1/8 teaspoon salt 1 cup flour 2 tablespoons vegetable oil
Directions: Blend all ingredients except for crushed saltines, flour and oil in large bowl. Add crushed saltines until mixture is no longer wet and can hold together. (You may use less, you may use more, depending on your crab.)
Form into four cakes, cover with plastic wrap and refrigerate for 30 minutes.
Heat oil in skillet over medium heat.
Put flour in a plate or shallow bowl and dredge cakes in it, lightly coating each side, then saute until cooked through and golden brown (approx. four minutes on each side).
Serve as is or on a split roll as a sandwich, with condiments of your choice.
Do you have a favorite recipe for crab cakes you want to share? Send it on in!
Originally posted to The Grub Report by Steve Gibson on May 23, 07 11:45 AM
Comments
At May 23, 2007 11:22 PM, James Cramer said...
It isn't a crab cake recipe but is my favorite use for canned crab meat.
Serves 4
Ingredients: 2 tbsp butter 1 chopped shallot 1/2 lb sliced fresh white mushrooms 1 tbsp chopped fresh parsley 2 tbsp flour 1 1/2 cups hot milk 4 oz well drained canned crab meat (I prefer white) 4 portions of cooked spiral pasta, hot salt and pepper
Melt butter in a skillet over medium heat. Cook shallot, mushrooms, and parsley for 3 to 4 minutes.
Mix in flour throughly. Reduce heat to low and cook flour for 2 minutes.
Season with salt and pepper, pour in milk continue mixing and cooking for 8 to 10 minutes over low heat.
Add crab meat, mix well and adjust seasoning to taste. Cook 2 minutes over very low heat.
Spoon sauce over hot pasta and enjoy.
At May 23, 2007 11:26 PM, Patricia Gibson said...
Wow. That sounds really good! Can't wait to try it. I think we have some leftover crab ...
At May 24, 2007 10:10 AM, Angie said...
Living in a landlocked state but loving seafood, I tried a recipe a few years ago that had promise.
"Connie's Zucchini Crab Cakes" is posted at http://allrecipes.com/Recipe/Connies-Zucchini-Crab-Cakes/Detail.aspx, and if you have zucchini from an area garden later in the summer, this is an enjoyable recipe to use. It utilizes 2 1/2 cups of shredded zucchini, drained well, and Old Bay seasoning. Because the recipe is published online elsehwere, I will not post the entire thing here, but I suggest you visit www.allrecipes.com and see this recipe and the 300+ helpful reviews.
I enjoyed it, and I can almost imagine it is related somehow to crab... my husband found that this was an okay way to use zucchini, but my crab illusion wouldn't hold.
So this is our land-locked version of pretend crab cakes, for what it's worth. :)
At May 24, 2007 8:51 PM, Nicole Noffsinger said...
Anyone have a specific brand that is better to use for crab cakes and other recipies that we have around here?
At May 24, 2007 9:51 PM, Steve Gibson said...
When I was comparing the shelf stable crab meat to the refrigerated I used Bumblebee (shelf stable) and Phillips (refrigerated). While the Bumblebee cakes were very good, the ones made with Phillips were just outta sight. I bought the Phillips clawmeat at Marsh and know that they usually have it in stock at the seafood counter. They also carry the lump crab meat, but have not seen it for a while.
At May 25, 2007 8:34 PM, Susan said...
The crab cakes look simply delicious! I was wondering, what if you're having an event and make the crabcakes but you also want to make sure you cater to those who may have a shellfish allergy? Any easy substitutions to make sure everyone has an enjoyable dinner? Thanks!
At May 25, 2007 10:21 PM, Steve Gibson said...
Susan, it's funny that you'd ask that. Worried that not everyone would be willing to jump aboard my crab cake bandwagon, I bought some gound turkey "just in case." With no real plan ahead of time, I just took the basic crab cake recipe (minus the Old Bay, mayo and flour) and made little turkey burgers. They were actually quite tasty and received rave reviews.
At May 25, 2007 10:33 PM, Steve Gibson said...
Angie, sounds like a great way to deal with that annual deluge of zucchini. I mean, how much zucchini bread can one man eat? Plus, it's just cool when you dress one food up like another. I was thinking that I should do a whole week's worth of faux foods. Zucchini Crab Cakes, Mock Apple Pie and... I dunno, Tofurkey?
At May 27, 2007 4:55 PM, Angie said...
Commenting on the faux crab... my brother and another family friend have shellfish allergies, but I've been able to use what we call "fake crab" (imitation crab meat) in recipes. I have a crab quiche in which I use this... it's made from Alaskan white fish, I do believe. This is good in pasta salads, also. (My husband generally prefers this to zucchini! :)
You know those thirty year-old mega losers that get all into doing fan videos based on the Star Wars films. I always thought that was pretty lame, you know. Playing dress up and play fighting with plastic swords. Of course, it was halfway through my parody of thisGrindhouse trailer that I realized... oh crap! I am one of those guys.
I've been meaning to do some short vids on the site, highlighting some of my favorite recipes... when I had a silly idea. I was planning to make some homemade pork sausage and all of a sudden, Grindhouse became Groundpork! Don't expect to see my ugly behind on camera. Maybe just a hand or forearm. I've spared you that horror, for now. I basically cobbled together a bunch of random shots from old exploitation films (can you identify them all?!?!) and some stuff from old educational films. Look for the crude, home grown effects I did that show pigs running from explosions and blood splattering from a side of pork. Simultaneously subtle and lame!
Also, don't forget that there actually is a recipe in there. It's a pretty basic breakfast sausage recipe you can build upon to suit your taste. You know, add some crushed pepper or other spices... it's up to you. Anyway, without further ado, check out Groundpork:
Tricia and I hosted the Thanksgiving holiday for the first time this year, and looking back it was pretty much a complete and total success. I figured I'd use this opportunity to run down the menu and rate the quality of the top five items I slaved over for the better part of yesterday. Please note that this list does not include the chestnut stuffing we made, as it ended up looking a whole lot like dookie.
Alright... it's official. I'm finished spreading the gospel of brining your Thanksgiving turkey. Don't get me wrong. I brined our turky this year and it was as juicy and flavorful as ever, but later Thanksgiving night I heard a turkey brining reference on ER. E freakin' R! Did you even know that show was still on? Yeah, that show hasn't been relevant since Clooney introduced the world to the Caesar cut. So, while I'll continue to give my gobbler an overnight dip in a bath of salty goodness, I think I'll just keep it to myself.
Growing up, I always got the sickening mallow-topped goo that looked about as appetizing going in as it did coming back out. Only in my adult life have I begun to warm to this surprisingly versatile un-spud. This time instead of going the mashed route, we took Sirley O.'s ole-timey advice and went with grated (actually food-processed) potatoes. Thinking the appearance to be a bit boring, we upgraded the dish with a quick streusel topping. Though I was pleased with how this dish turned out, I would like to give this one another shot with fresh rather than ground ginger. I dunno, I just think it would benefit clean flava of the fresh stuff.
Green Bean Casserole was invented by Campbell's Soup back in the mid-'50s, presumably to boost sales of their practically inedible on its own cream of mushroom soup. I fell in love with the french onion topped stuff in the early nineties, at a carry-in dinner of course, and looked forward to digging into it at every subsequent gastro-centric social event. A recent issue of Cook's Illustrated featured a recipe for green bean casserole that did away with all of the processed foods that make up the traditional dish and recreated all of the flavors with fresh ingredients. I knew right then and there that the recipe would be making an appearance on our Thanksgiving table. I totally hated cleaning and cutting the two pounds of fresh green beans, but it was totally worth the effort. The result was ten times better than the casserole you're used to.
Another Shirley O. recipe, this was one of those things that you just don't think of people making at home. There's a reason for that too. Pecans cost about a zillion dollars a pound. This recipe called for both pecan pieces AND pecan halves. So, the pie ended up costing like $25. Still... it was worth every penny. It's always amazing when you try and replicate a food you love at home and when you get done you're like, "Yup, that's pecan pie, alright." Plus... it had booze in it.
I just sorta ganked this one off the web whilst checking out AB's brined turkey recipe. It was the last addition to the menu and oddly enough will probably be the recipe that I revisit the most between now and next Thanksgiving. I nice, light alternative to regular cornbread or corn pudding-type thing... except this one jacks the flavor up to 11.


